Flight
Log XL - VFR easy planner
|
Copyright (C) 2001-2008 Andrea Moressi
ver. 5.1.0
go to: www.flightlogxl.com
Summary:
- Installing
and starting the program
- Quick start
- Cooperate
with FlightLog XL !
- Using FlightLog XL
Introduction
The date of
flight
The
ground speed
The
active row
Waypoint
types
VOR
radio aids and DME distance
NDB
radio aids
Altitude
Magnetic
bearing
Leg
distance
Leg
time
The
Check column
ETO,
RETO, ATO
Airfield
Info window
ATS Info
window
VOR Info
and NDB Info windows
Aeronautical
sunrise/sunset
The “Aircraft …” button, climb
and descent parameters
The 'Waypoints …' button, Waypoint Manager
The
'Delete line' button
The
'Reset Form' button
The
'Print log' button
The
'Help' button
Saving
a log for later use
- Geographical
coordinates
- Declination computing &
geomagnetic model
- FlightLogXL’s users survey
- License agreement
Flight
Log XL - VFR easy planner
Installing and starting the program
FlightLog XL is a
software application written for Microsoft Excel2000® and needs it to be
installed on your computer in order to work.
FlightLog XL comes
as a self-extracting file that can be freely downloaded from the Internet at
the site www.flightlogxl.com .
When the
executable file, called FlightLogXL.exe, is opened, a form is shown where
you'll be prompted to specify the position where the program will be saved on
your computer (the default path 'C:\' is supplied).
Clicking the
'Unzip' button, a directory named FlightLog XL will be created and filled with
the following files:
FlightLogXL.xls It's the Excel® worksheet
containing the actual program
Wmm.cof It's the
geomagnetic model file
FlXL_Help_ita.htm It's the Italian-language Help
file
FlXL_Help_eng.htm It's the English-language Help file
(the one you are reading)
These files
represent the complete distribution of the program and must not be distributed
separately. Please see the paragraphs Introduction and License agreement.
To start FlightLog
XL just open the file ‘FlightLogXL.xls’ (double click). Microsoft Excel® is
launched and the program executed.
Depending on your
Excel settings, you could be asked whether or not activating Macros. For
FlightLog XL to work it's absolutely necessary that Macros be activated.
The starting
screen shows a brief disclaimer that can be viewed in Italian or English
language. The language you select at this point will be retained for program
execution and determines the language for the error messages that FlightLog XL
can generate and for the Help the program will show.
When you close the
disclaimer window by clicking the OK button the Flight Log is ready for filling
in.
Quick
start
Note:
user can input data on
green cells and shouldn't write on all other cells.
1)
Input the date of flight on the upper left side of the
sheet
2)
Input the ground speed you want the log to be computed
for. FlightLog XL takes into account of climb and descent performance of the
airplane computing some default parameters that depend on the selected speed.
If you wish to modify these parameters, introducing those specific for your
aircraft, click on the “Aircraft …” button.
3)
Move the cursor on the first row of the log (row no. 6
of the Excel sheet) clicking on column A. Click the arrow on the Waypoint list
box and choose from the dropdown list the waypoint you want to start the
navigation from. The list will only show the type of Waypoints selected by the
corresponding option button: simple waypoints (geographical points), airports
or radio aids (VOR or NDB).
4)
Click on the arrow inside VOR and NDB list boxes,
selecting the radio aids useful for the navigation on that point. The program
calculates on which VOR/NDB radial the waypoint lies. Input the altitude to be
kept over that point.
5)
Enter the altitude in feet to be kept over that point.
6)
Select the next row and start again from point 3).
The program
computes the magnetic bearing to be kept on the directional gyro to get to the
point, the distance to the point in nautical miles and the time needed to reach
the point at the chosen ground speed.
Here follow, in
detail, the instructions related to the different parts and functions of
FlightLog XL.
Introduction
FlightLog XL was
born 'for fun' as a simple program to plan a VFR flight without having to
manually gather the route and distance information from the geographical chart
and manually write them down on a paper log to keep in the cockpit during
flight.
The FlightLog XL
printout is a paper report of the flight log substantially identical to what
you should obtain filling out manually the traditional planning form.
The purpose to
avoid the manual phase of the flight planning is to eliminate the possible
mistakes while collecting and rewriting heading and distance dat
The FlightLog XL
working relies on a database of waypoints that can be either simple
geographical points of known coordinates or airfields or VOR/NDB radio
stations.
Of all of these
points, FlightLog XL must know the geographical coordinates and possibly other
suitable information like radio frequencies for airports and radio aids or the
field elevation and so on.
Any added
information on airports ad radio aids used in the log of a particular flight is
automatically printed on the log itself, in order to supply the pilot with all
(or nearly all!) the planning information he needs.
The pilot will only have to input, once for
all, the data concerning any single point that he'll be able to re-use any
other time.
FlightLog XL is
distributed by the author under the GNU/GPL license. It is allowed to copy and
redistribute the program, provided it is transferred on its entireness and not
partially.
It's important to understand that the use of FlightLog XL does not
relieve the pilot from the responsibility to check all the data on the log;
both the ones already available inside the program, like waypoint lists, and
the ones generated by the program through calculations. It is clear that a
mistake entering a waypoint coordinate would affect calculations related to the
track from and to that point, and the pilot should become aware of that before
flying, by checking the sense of what printed.
The author doesn't supply any warranty and doesn't assume any
responsibility on data retrieved using FlightLog XL.
Please refer to
the License agreement section of this
manual for copyright and distribution information.
The date
of flight
The date
when the flight is going to take place must be entered in the green cell on the
upper left corner in the format DD/MM/YY.
It's an
important piece of information because it allows the program to calculate the
magnetic declination, which varies with time, to determine the magnetic heading
starting from the geographical one.
![]()
Dates
preceding the current date won't be accepted.
The Ground Speed
FlightLog XL
calculates the log for a given ground speed that the pilot issues.
In this version
the program disregards wind effects.
The Ground Speed
the program uses for planning calculations is supposed to be constant during
the level flight, while a decrease is calculated for climb and descent phases. The Ground
Speed of the airplane in level flight must be entered in the specific green
cell on the top of the log.
The active
row
Information
related to the selected waypoints or radio aids are shown on the row that is
active at the moment.
To make a row
active you must click on the first column of the row itself, or move the cursor
on it using the arrow keys.
A red border
surrounding it marks the active row. Any selection or modification made will
reflect on this row only.

Waypoint
types
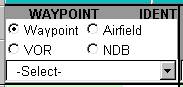
It is possible to
enter and recall four different kinds of waypoints on the first column of
FlightLog XL.
1)
Simple Waypoints:
these are geographical points like cities or reporting points and no other information is associated to them except geographical coordinates.
It's possible to select them by activating the option button 'Waypoint' and clicking the arrow inside the listbox in the first column. A dropdown list will appear from which you'll be able to select the desired waypoint.
If the waypoint is
not in the list yet, just enter it by clicking the 'Waypoints …' button. The
Waypoint Manager form will be displayed and the entered data will be saved in
the Waypoints sheet.
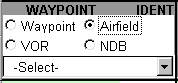
2)
Airfields:
these are either
airports or airfields.
It's possible to
select them by activating the option button 'Airfield' and clicking the arrow
inside the listbox in the first column. A dropdown
list will appear from which you'll be able to select the desired airfield.
In addition to coordinates (to be found on Jeppesen
charts or Bottlang), some more information has to be entered which are the ICAO
identifier, the type of air traffic control to establish contact with on the
radio (AFIS, TWR, …), the radio frequency, the available runways and the field
elevation in feet.
The additional
information on the airports selected for a particular flight will be printed in
a specific box on the log to be available during flight. See 'Airfield Info'.
Airfield data are
entered through the Waypoint Manager form shown by clicking the 'Waypoints…' button and saved
into the Airfields sheet.
3)
VOR:
see below …
4)
NDB:
see below …
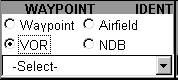
VOR radio aids
VORs are the VHF radio beacons. It's possible
to use them as waypoints that it's easy to point to with the help of
instruments by selecting them in the waypoints column or use them as stations
from which to get a magnetic bearing to check the flight progression.
In the first case select them from the
waypoints list clicking the down-arrow of the listbox
in the log's first column, after selecting the 'VOR' option button among the
others placed above the listbox itself.
In the latter case
select them on the active
row in the VOR column clicking on the proper listbox
and choosing from the dropdown list.

QDR:
The value shown in bold by the program in the
‘radial’ column, is the magnetic VOR radial the airplane is on when overflying
the waypoint shown on the selected row (magnetic bearing FROM the station or
QDR).
Setting the instrument OBS on this value you'll
get the index centred when overflying the waypoint.
DME: (from rel.5.0.0)
The value written in the lower part of the
‘radial’ column, preceded by a D, is the DME distance of the waypoint from the
DME station co-located with the selected VOR (VORDME).
The DME distance is the ‘slant’ distance in nautic miles shown by the DME receiver (Distance Measuring
Equipment), when available on board.
To calculate the DME distance the program needs
to know the flight level of the airplane, to be entered in the ‘Alt’ column,
and the VOR elevation, that is its height above ground, to be entered among the
VOR data in the waypoint manager.
If either of these piece of information is
missing, the DME-distance box shows a small red triangle with a short
comment that explains the error.
VORs have the following information associated,
retrievable from Jeppesen charts, in addition to coordinates:
3-letter code (Ident),
Morse code, radio frequency, elevation (height above terrain).
The additional
information on the radio beacons selected for a particular flight will be
printed in a specific box on the log to be available during flight. See 'VOR Info'.
VOR data are
entered through the Waypoint Manager form shown by clicking the 'Waypoints…' button and saved
into the VOR sheet.
Starting from
FlightLog XL version 2.2, it is possible to show a second VOR column, thus
relying for navigation on two VORs and one NDB for each waypoint of the route.
This function is particularly helpful on aircraft provided with two NAV
receivers and so two VOR indicators.
To show the second
VOR column just select the “Show VOR2” checkbox located on the VOR1 column (see
figure above).
To make the
selection of radioaids quicker, from version 2.2 the
button “As Previous” is available on VOR and NDB columns, which allows to
select on the current row the radioaid already
selected for the previous row.
NDB radio
aids
NDBs are the non-directional radio beacons. It's
possible to use them as waypoints that it's easy to point to with the help of
instruments by selecting them in the waypoints column or use them as stations
from which to get a magnetic bearing to check the flight progression.
In the first case select them from the
waypoints list clicking the down-arrow of the listbox
in the log's first column, after selecting the 'NDB' option button among the
others placed above the listbox itself.

In the latter case
select them on the active
row in the NDB column clicking on the proper listbox
and choosing from the dropdown list.

The value calculated by the program in the
'(QDR)' column is the bearing FROM the station that the airplane gets when it
overflies the waypoint shown on the selected row. Turning the instrument knob
so that the airplane actual heading value is on the 12 hours, the indicator's
TAIL will show the value printed on the log in this column. This is also true
if an RMI or HIS is available, with the obvious difference that no manual
setting will be needed.
NDBs have the following information associated,
retrievable from Jeppesen charts, in addition to coordinates:
3-letter code (Ident),
Morse code and, obviously, radio frequency.
The additional
information on the radio beacons selected for a particular flight will be
printed in a specific box on the log to be available during flight. See 'NDB Info'.
NDB data are
entered through the Waypoint Manager form shown by clicking the 'Waypoints…' button and saved
into the NDB sheet.
To make the
selection of radioaids quicker, from version 2.2 the
button “As Previous” is available on VOR and NDB columns, which allows to
select on the current row the radioaid already
selected for the previous row.
Altitude
In the 'Alt' column you'll have to enter the
altitude in feet to be kept over the waypoint.
If the point is an
airport, it will be helpful entering here the traffic circuit altitude.
FlightLog XL also
uses altitude in the magnetic declination computing and for climb and descent performance calculations. See
'Declination Computing and
Geomagnetic model' for any further information about this subject.
Magnetic
heading
It's the heading
to be kept on the directional gyro or on the compass to get to the selected
waypoint coming from the previous one (disregarding wind effect).
It is calculated
algebraically subtracting the magnetic declination from the true heading
(geographical).
It is worth
pointing out that FlighLogXL calculates the heading
by ‘great circle’ formulae, that is considering an ‘orthodromic’ path, which is the shortest. The heading shown
is the initial outgoing heading from the starting Waypoint which is not
constant, as in the case of a loxodromic path.
Nevertheless, considering the short distances between two Waypoints in a route,
it is possible to disregard the error and consider the heading constant all
along the route with very good approximation. Calculating the loxodromic path instead, would have made the program
inaccurate getting next to the poles.
The formulae used
for geodetic calculations are the Ed Williams’ work http://www.best.com/~williams/avform.htm, and we want to
thank him.
Along track distance
It is the
distance, expressed in nautical miles, which separates the considered waypoint
from the previous one. As the magnetic heading, it's calculated by the same set
of geodetic formulae.
In the distance column header (Leg Dst) the total distance of the flight is shown (TOT DST).
Track time
It's the time, in
minutes, that the airplane will take to cover the Along Track Distance,
disregarding the wind effect and flying at the speed entered in the 'Estimated
ground speed' cell. During climb and descent,
the program calculates a proper ground speed decrease.
In the time column
header (Leg Time) the total flight time is shown (TOT TIME).
Check
column
This column is not
compiled by the program and remains blank for the pilot to check waypoints
during the flight. It's also helpful to mark, during flight, the future
reporting points that the traffic control asks for, in such a way that the
pilot doesn't forget them.
ETO, RETO,
ATO
These are the Estimated Time Over, the Rectified
Estimated Time Over and the Actual Time Over a particular waypoint.
These columns are
left blank by the program for the pilot to fill them in during flight as in a
traditional manual flight log.
The Airfield
Info box
This box contains
information on the selected airports, entered by the user in the Waypoint
Manager form shown by clicking on the 'Waypoints …' button, that can be
retrieved from Bottlang.
The information is
the ICAO identifier of the airport, the air traffic control to be contacted
(AFIS, TWR, Radio …), the radio frequency of the airport, the runway or runways
available and the field elevation on the sea level expressed in feet.
This box is printed
on the paper log so that the information related to all of the airfields
touched during the flight is quickly available for the pilot.
The ‘ATS
Info’ box
This window shows
the frequencies of the Air Traffic Services (ATS) affected by the route.
The ATS
frequencies are picked up from the information associated to the Waypoints as,
for any single Waypoint, it is possible to specify the
airspace it belongs to. See The ‘ATS Information’ section of the Waypoint Manager
for further information on this subject.

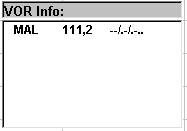
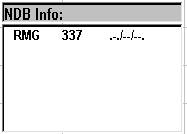
VOR Info
and NDB Info boxes
These boxes
contain information on VOR and NDB radio aids selected in the flight log,
entered by the user in the Waypoint Manager form shown by clicking on the 'Waypoints …' button, that can
be retrieved from Jeppesen charts.
The information is
the station 3-letter identifier, the Morse code (automatically generated by the
program) and the station transmission frequency.
This box is
printed on the paper log so that the information related to all of the radio
aids selected for the flight is quickly available for the pilot.
Aeronautical ephemeris
In the upper-right
box next to the Ground Speed cell, the pilot can write down TakeOff
and Landing time.
In the same box
the program shows the aeronautical sunrise/sunset time considering sunrise on
the first waypoint of the log (supposed to be the one where takeoff takes place)
and sunset on the last airport selected on the log (supposed to be the landing
airport).
Ephemeris are
recalculated upon variation of the 'date of flight' issued.
Caution: UTC time
is used (i.e. referred to the Greenwich time zone);
the pilot has to take into account the time-zone difference at his location and
possibly the daylight-saving time.

The 'Aircraft…' button, climb and
descent parameters
From version 3.0,
FlightLog XL takes into account climb and descent performance of the airplane
for a more accurate computing of times.
Climb and descent
parameters are automatically calculated by the program whenever the planning
speed (Ground Speed) is modified, using
default values reasonable for the average general aviation low-performance
planes.
It is however
possible, other than advisable for a better planning, to personalize climb and
descent parameters entering them into the “aircraft data & parameters” mask
(figure below), shown by clicking on the “Aircraft…” button.
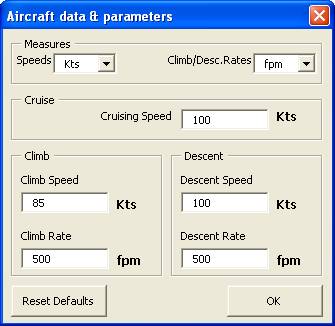
Units of measurement:
Although
aeronautics should be the world of standards, getting aboard an airplane, even
if identical to another we are accustomed to, it’s unfortunately very common
running up against instruments calibrated using plenty different measures, for
reasons that spread from installation at different times, to the original
registration of the aircraft in a foreign country. Thus we happen to get by
radio a QNH in hectopascal and to have an altimeter
calibrated in “inches of mercury” (!), or to have a checklist in knots but to
read an anemometer in mph. Or we happen to pilot an airglider
where all the unit of measurement are metric (hurrah!). All this stuff is in
shameful contrast with the need for standardization and safety in aeronautics
but, that’s it: “the good thing about standards is that everyone can choose the
one he likes most”!
In FlightLog XL
the main parameter that calculations are based upon is the Ground Speed which
is, for clarity, always expressed in knots on the main sheet.
To make pilots’
life easier, anyway, in this mask for flight parameters it is possible to use
different units of measurement, by selecting them in the boxes on the top
separately for horizontal speeds and for climb and descent rates.
Switching from one
unit to another, FlightLog XL makes the proper conversions.
The cruising speed:
For our purposes,
and disregarding wind effect, it coincides with the Ground
Speed of the airplane in level flight, used to plan the flight and written
on the main sheet.
The ground speed,
in this mask, is expressed in the unit selected above but, on the main sheet, it
is always converted and printed in knots.
The climb and descent
speeds:
Climb Speed: it is the cruising
climb speed (airspeed) of the airplane during climbing phases. Generally it is
slightly higher than Vy.
If not
differently specified, FlightLog XL sets the Climb Speed to be 85% of the
cruising speed.
Descent Speed: it is the
cruising descent speed (airspeed) of the airplane during the descending phases.
Generally it is slightly lesser than the cruising speed.
If not
differently specified, FlightLog XL sets the Descend Speed to equal to the
cruising speed, taking for granted that the descent occurs
reducing power without modifying the trim setting.
The climb and descent rates:
They are
the vertical speeds (those read on the variometer)
assumed by the aircraft during climb (Climb Rate) and descent (Descent Rate).
If not
differently specified, FlightLog XL sets both rates to the prudential value of
500 feet-per-minute.
Note that
FlightLog XL considers the climb rate constant throughout the whole climb,
disregarding the actual decrease it suffers with the increase of the flight
level. Thus, when you enter the climb rate of your airplane, it is advisable to
use a value related to an intermediate flight-level among those reached during
that specific flight.
The “Reset
Defaults” button:
It
allows to reset the values that FlightLog XL sets by
default:
Climb
Speed = 85% of the Cruising Speed, Descent Speed = Cruising Speed, Climb Rate =
Descent Rate = 500fpm.
The “OK” button:
It
closes the mask saving values on the “Aircraft” sheet.
The 'Waypoints' button, Waypoint manager
All data regarding
waypoints, airports and radio aids are saved on different sheets of the
Microsoft Excel® Workbook.
To enter or modify
these dat
§
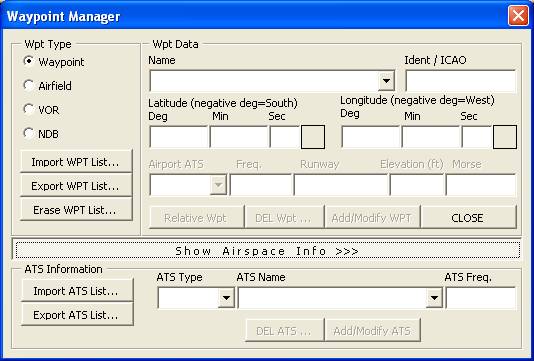
Entering
a new Waypoint:
To enter a new
Waypoint you have to select its type in the Wpt Type
frame on the left side and fill in the relevant text boxes starting from the
name to be given to the Waypoint itself.
The input boxes in
this form are enabled or disabled by the program depending upon the type of
waypoint to be entered. For example, when the user selects a simple waypoint,
all the input boxes not significant for a waypoint are disabled (see figure
above).
When moving the
mouse pointer on input boxes and buttons, a brief help text is shown to assist
in the data input.
When finished just
click the ‘Add/Modify WPT’ button, or press ‘CLOSE’ to quit the current input.
§
Modifying
an existing Waypoint:
To modify a
Waypoint you have to select it from the dropdown list shown by clicking on the
down arrow in the Name box. The list will contain only Waypoints of the type
selected in the frame on the left: that is, it will only contain simple
Waypoints or only Airfields or only VOR or NDB radiobeacons.
Once you have
selected the desired Waypoint it is possible to modify its fields (except for
the name) and then to save it clicking ‘Add/Modify WPT’.
Please note that
the name of a Waypoint identifies it in the list and so, if you modify the
name, a new Waypoint will be saved instead of the selected one modified.
The only way to
modify the name of a Waypoint is to select it, change its name and save it, and
later delete from the list the Waypoint with the old name (see below).
§
Deleting
a single Waypoint:
Recall the
Waypoint to be deleted selecting it from the dropdown list shown by clicking
the down arrow in the Name box. The list will contain only Waypoints of the
type selected in the frame on the left: that is, it will only contain simple
Waypoints or only Airfields or only VOR or NDB radiobeacons.
Once selected,
click the “DEL Wpt …” button to cancel it from the
list.
§
Deleting
all the Waypoints of a given type:
The button “Erase Wpt List …” allows you to cancel
the whole Waypoints list of the type selected in the Wpt
Type frame on the left. It will then be possible to erase in a single shot all
the geographical Waypoints or all the Airfields or all the VORs or NDBs.
NDB.
§
Exporting
and Importing a list of
Waypoints:
FlightLogXL allows, starting
from release 2.0, to export on a file the Waypoints previously entered or to
import them from a file which has formerly been created through the Export
functionality.
In this way the user
can save his own personal lists of Waypoints / Airfields / Radioaids
and re-import them in future versions of the program, or make his lists
available to other FlightLog XL users (see below).
The “Export Wpt List …” button allows to save
on a file the list of Waypoint of the type selected in the Wpt
Type frame. The program asks for a file name to save the list that can be
freely chosen by the user. The only mandatory part of the name is the file
extension (the three letters following the dot) which must correspond to the following
scheme:
Extension Type
of exported Waypoints
.wpt simple waypoints
(that is geographical points)
.afd Airfields
.vor Vor
radiobeacons
.ndb Ndb
radiobeacons
The “Import Wpt List …” button allows the user to import a list of
Waypoints previously exported from FlightLogXL. In
this case the extension of the selected file will identify the type of
Waypoints to load. Selecting a file with the .afd
extension means to import Airfields, aside from the type selected in the Wpt Type frame.
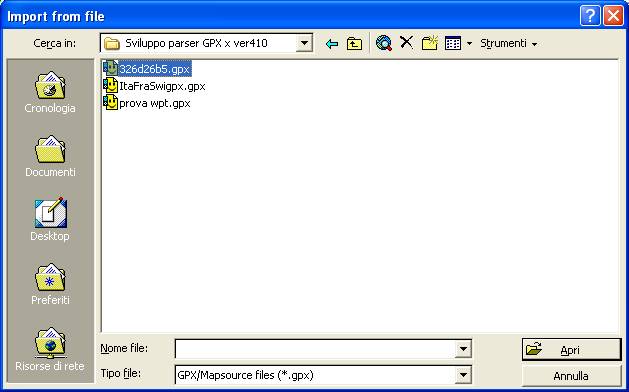
The “Import Wpt List …” button also allows, from version 4.1.0, to
import waypoints in GPX format (see below).
§
Importing
Waypoints in GPX format:
Starting from
version 4.1.0 FlightLogXL allows to import waypoints
in GPX format generated by other programs or downloaded from some Internet
sites.
The GPX (GPS eXchange
format) is an XML file used by many commercial and freeware software including
Garmin Mapsource and EasyGPS.
There are also
Internet sites which give the opportunity to download waypoint collections in
GPX format, as the great GPX
Aviation Waypoint Generator by Paul Tomblin which
can generate a GPX waypoint archive related to a specific area.
A GPX file may
contain geographic waypoints, airports and radioaids
contemporarily.
To import a GPX
file in FlightLogXL you just have to select in the
Import form the GPX format, as shown below.
Caution:
The Waypoint lists
belong to the Excel Workbook. All Waypoint additions or changes are then
memorized along with the Excel sheet when it gets saved.
The program does not
allow to cancel a single add/change operation but it is clear that exiting
Excel without saving means to cancel all of the changes or additions made to
the Waypoint lists.
§
The
‘ATS Information’ section:
Beginning from 4.0
release, the ‘Waypoint Manager’ mask contains a new
section related to airspace information.
To
show and hide the ‘ATS Information’ section, click on the ‘Show Airspace Info
>>>’ button, well visible on the bottom part of the mask.
In this section it
is possible to link the selected Waypoint to the proper airspace it belongs to;
selecting the airspace on the ‘ATS Name’ box and saving the Waypoint by the
‘Add/Modify WPT’ button, the information associated with the Waypoint will
include the pertaining ATS, whose frequency to be contacted during flight will
be printed in the ‘ATS Info’ window.
The adding and
managing of the ATS services take place like the corresponding functions
relative to Waypoints.
See ahead for a
brief explanation about any single control.
The ‘ATS Type’ box:
It allows to select the ATS type among the following:
- FIC (Flight
Information Centre), the ATS which controls a FIR
(Flight Information Region) airspace, for example ‘London Information’
- ACC (Area Control
Centre), the ATS which controls a CTA (Control Area), an AWY (Airway) or a TMA
(Terminal Area), for example ‘Alexander Control’
- APP (Approach Control
Centre), the ATS which controls a CTR (Control Traffic Region), for example
‘Georgetown Approach’
The ‘ATS Name’ box:
It allows to enter the name of an ATS. The user will enter the
complete name for the ATS, like ‘London Information’ for a FIC, ‘Georgetown
Approach’ for an APP and so on.
The ‘ATS Freq’ box:
Enter here the
radio frequency for the ATS. It will be displayed inside the ‘ATS Info’ window on the Log.
The ‘Add/Modify ATS’, ‘DEL
ATS’, ‘Import ATS List’ and ‘Export ATS List’ buttons:
They work like the
corresponding buttons in the Waypoint section but they just affect the ATS
list.
The lists of ATS
are exported on files whose extension is ‘.ats’ .
§
Relative Waypoints, the
‘Relative Wpt’ button:
Starting from
release 4.0 the ‘Waypoint Manager’ window has a new feature to create a new
Waypoint “relative” to a known one, by supplying ‘polar’ coordinates, that is
distance and course to reach the new Waypoint starting from the reference Wpt.
By clicking on the
‘Relative Wpt’ button, a mask pops up showing the
following controls to let the user enter a new Relative Waypoint:
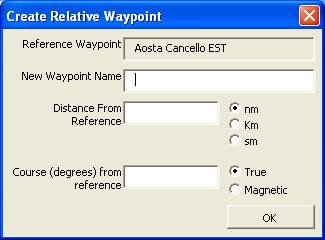
Reference Waypoint:
It’s the name of
the Waypoint taken as a reference, that is the one
selected in the Waypoint Manager, to be used as a starting point to create the
new Wpt.
New Waypoint Name:
It’s the name of the
new Waypoint to be created.
Distance From Reference:
Enter here the
distance from the Reference Waypoint to the new Waypoint. The distance may be
expressed in nautical miles, in kilometres or in statute miles according to
which option button is selected on the right-hand side.
Course From
Reference:
It’s the course,
in degrees, to reach the new Waypoint starting from the Reference Waypoint. It
may be a “true” course (reckoned from a chart) or a magnetic course, in
accordance to the proper option button selected on the right-hand side of the
box.
It’s advisable to
supply a true course as the computation of a new Waypoint through a magnetic
course is necessarily less accurate.
Anyway, the
creation of Relative Waypoints has to be used on short distances only, to avoid
the errors committed by measuring distance and angle from becoming relevant.
The ‘OK’ button:
By clicking on
‘OK’ the window is closed and the name and coordinates of the new Waypoint are
written in the ‘Waypoint Manager’ mask. Now it is possible to fill-in the
remaining fields and confirm the input.
Exchange of Waypoint lists among users: cooperate with
FlightLogXL !
The FlightLog XL
web site (www.flightlogxl.com) contains
a section to download Waypoint lists related to specific zones. In this section
are present Waypoint lists that other users have freely made available to
everyone, in the friendly cooperation spirit that characterizes all the public
domain software.
Those
who appreciate and use FlightLogXL are strongly
encouraged to make available Waypoint lists they have created for themselves. The lists will be
as useful to other users as they are complete for the covered zone.
Please export and
send the author (info@flightlogxl.com)
your Waypoint databases. They will be published on the web site reporting your
name. It will be highly appreciated the contribution of those who will send,
for a given zone, the four files containing simple Waypoints, Airfields, VORs
and NDBs; for example: “North California.wpt”,
“North California.afd”, “North California.vor”
and “North California.ndb”.
Thanks to anybody
will cooperate!
The 'Delete line' button
Clicking this
button, the current row (the one surrounded by a red border) is deleted and the
following rows are shifted upward.
The 'Reset Form' button
Clicking
this button all the log rows are cancelled, the information boxes are cleared
and the flight log is ready for starting again with a new planning.
The 'Print log' button
It's the button
that allows printing the flight log at the end of the input work. Clicking on
it, the program asks for a name for the log that will be printed as a title on
the page. Then the standard Excel mask for printer selection is shown. Clicking
OK the flight log is sent to the printer.
The 'Help' button
Shows
this file opening the default browser.
Saving a
log for later use
FlightLog XL
doesn't provide, at the moment, for the possibility to save a planning with a
specific internal command. Nevertheless, the log obtained is just a normal
Microsoft Excel® Workbook that can be saved by specifying a name.
The user who might
want to save the flight planning for the flight Wichita - Tulsa could save the
whole workbook selecting the menu command 'File->Save as …' and choosing a
proper name for the flight log, for example 'FL Wichita-Tulsa'.
This implies some
disk memory wasting but, for modern machines, this really represents a little
problem.
Geographical coordinates
In order to
calculate routes and distances among different points, FlightLog XL has got the
need to know the exact position on the terrestrial globe of any significant
point present in the log.
For all of the
waypoints that the program saves, either simple waypoints or airfields or radio
aids, the geographical coordinates have to be specified. It is upon the
accuracy of these coordinates that the precision of FlightLog XL's calculations depends.
The coordinates of
any single saved waypoint are entered trough the input form displayed clicking
the 'Waypoints…' button.
The angular
distance from the equator, measured at the centre of Earth, is called the
Latitude. It can assume values from 0 to +90° (Northern latitudes) and from 0
to –90° (Southern latitudes).
The angular
distance from the
There are at least
3 different notations to express coordinates, two of which are most frequently
used.
In the first
notation, coordinates are expressed in degrees, minutes and seconds. The three
values are, in this case, integer numbers; for example 45°
In the second
notation, degrees, minutes and decimal of minutes are indicated. The number
expressing minutes is an integer value, while minutes are expressed as a
decimal value, generally indicating decimals and centesimal of minute; for
example 45° 31.24’. As one centesimal of minute is a smaller angle than one
second, this notation is often preferred because it allows a better precision.
It's important to
note the difference between these two different ways to express coordinates
'cause it's quite easy to confuse them and consider seconds what are centesimal
and vice-versa. The most of GPS receivers, for example, can be set to indicate
coordinates in any of the two methods.
The third notation
for coordinates only expresses degrees with a decimal number. For example the
value 45.342° is equal to 45° 20.52’. This kind of notation is used in some
Internet sites where it is possible to retrieve the geographical coordinates of
a given place.
FlightLog XL's data input mask accepts coordinates expressed in any
of the three formats above mentioned.
If the user,
during data input, enters a decimal value of degrees, it is automatically
converted into integer degrees, minutes, decimals and
centesimal.
If coordinates are
entered in degrees, minutes and decimals, it won't be possible to specify
seconds and the program prompts for this when the user tries to confirm the
input.
Airport
coordinates are always retrievable from Bottlang pages; VOR and NDB coordinates
are listed on Jeppesen charts; coordinates of geographical localities can be
found in some Internet sites like 'mapblast' (www.mapblast.com)
for the USA.
The entire flight planning
made by FlightLog XL relies upon the precision that coordinates are expressed
with.
Declination computing and geomagnetic
model
Starting from coordinates of the entered points,
FlightLog XL calculates geographical routes, that is, referred to the true
North and not to the magnetic North. To obtain the magnetic heading to be
displayed on the log, the program must know the magnetic declination at all the
points on the route, at the indicated flight altitude.
It's very
important for FlightLog XL to keep declination into account because planning a
flight in some geographical areas without considering declination, could lead
to unacceptable errors.
The magnetic
declination, that is the difference between true heading and magnetic heading, varies
in time and space according to undefined rules, whose long-term progress can be
considered substantially random.
To determine the
magnetic declination for a point through mathematical calculations is thus
indispensable to resort to a model, which represents the progress of the earth
magnetic field all over the surface of the globe.
There are
fundamentally two models, called geomagnetic models, which describe the earth
magnetic field. The first one issued by the US NOAA (http://www.ngdc.noaa.gov/IAGA/wg8/igrf2000.html) and the second,
called the WMM (World Magnetic Model, http://www.ngdc.noaa.gov/seg/potfld/DoDWMM.shtml) mastered by the
US Department Of Defence.
Between the two
models, both of public domain, FlightLog XL uses the latter for the simple
reason that it's the same used by all GPS receivers.
The WMM is based
on earth magnetic field measuring at an high number of sites on the whole globe
and on its mathematical representation through a series of characteristic
values listed in a file (Wmm.cof) which has a
five-year validity. The program starting from data contained in this file makes
the highly complex calculation of declination.
The model file
used at the moment is distributed along with FlightLog XL and must reside in
the same directory that contains the Excel sheet itself.
Every 5 years
(2000, 2005 …) an updated geomagnetic model is released and the file must therefore
be replaced.
FlightLog XL
prompts at start-up when the geomagnetic model is out of date and has to be
updated; in this case just download the latest version of the program from www.flightlogxl.com .
FlightLogXL users
survey
Starting from
release 5.1.0 a survey system to check the satisfaction among FlightLogXL’s users has been introduced, in order to gather
statistic data on the program’s usage and to facilitate sending opinions and
comments by the users which, up to April-2008, have reached over
When a Log is
printed for the first time, the program shows a form that the user can fill to
express his/her satisfaction on a scale from 1 to 5, also adding a brief
comment to be sent to the author.
The survey is
shown just once for each release of the program.
The data are
collected for statistic purposes only and are not released to third parties for
any reason.
License agreement (GNU General Public License)
Flight Log XL –
VFR easy planner
Copyright (C)
2001-2008 Andrea Moressi – Milano, Italy
This program is free software; you can
redistribute it and/or modify it under the terms of the GNU General Public
License as published by the Free Software Foundation; either version 2 of the
License, or any later version.
This program is distributed in the hope that it
will be useful, but WITHOUT ANY WARRANTY; without even the implied warranty of
MERCHANTABILITY or FITNESS FOR A PARTICULAR PURPOSE. See the GNU General Public License for more
details.
You should have received a copy of the GNU
General Public License along with this program; if not, write to the Free
Software Foundation, Inc.,
For any further
information concerning this program please contact the author by e-mail at the
address info@flightlogxl.com .